
I’m excited to share my kitchen pantry organization tips to help you stay organized, as well as how I covered my wire shelving for less than $10! Check out this post for some realistic pantry organization ideas!

Our new home has blessed us with so much, but it did not bless us with a big walk-in pantry. However, I am up for the challenge! I am excited to share my kitchen pantry organization tips and tricks with you to help organize your small pantry full of dry goods and keep it that way! My organizational discoveries work for pantries of all sizes, though. The kitchen is the heart of the home and where most of your time is spent. If the kitchen is a mess, then we are a mess. So let’s get our small pantry organized and get our kitchen flowing nicely. Lets maximize on that pantry storage.
Added bonus, I am sharing how I covered my wire shelving for less than $10 using contact paper and foam core board—an easy way and great option to maximize storage space and keep your small pantry organized with the right organizers, shelf risers, storage bins and lazy susans (of course)!
Let’s get organized together! Once you get your kitchen pantry organized, head over to my Kitchen Organization post next!
This post is all about kitchen pantry organization!
Pin Small Pantry Organization for Later

How to Cover Wire Shelving
Shelving Covers

Would you believe me when I say this shelving upgrade cost me less than $10 total!?!? Believe it! I can not stand wire shelving, but Alex has plenty on his honey-do list. I would love to replace all our shelving with wood, but this is my solution for the meantime using foam board and contact paper. It’s a great option if you’re on a tight budget! It’s an easy way to make a huge difference with little effort. I think I may do this to every single one of our closets!
Measure and Remove Shelving

Before buying your foam board, measure the surface of your pantry shelves. For our small pantry, one foam board per shelf was plenty. Check out your local Dollar Tree first when purchasing the foam board, ours had plenty and I know other stores charge triple the amount for the same thing. Remove the contents of your pantry and all shelving except for the lowest shelf. This will allow easier installation. Also, this is a great time to check those expiration dates and toss any pantry items that are no longer good. Clearing out space will help with storage space too!
Cut Foam Board

Cut your foam board to the appropriate size. Don’t forget about the front piece too! Lay the foam over the bottom shelf to check sizing. If you like the way it fits, use this as your template for the other foam boards. Be sure to remove any stickers or labels.
Attach Contact Paper


Roll out a piece of contact paper big enough to cover the 2 pieces of foam board (one for the top and the smaller ones for the front). I made sure mine was big enough to fold over all sides of the board to create a smoother edge. Peel off the backing and lay it face down on a flat surface. Lay your foam board on top and flip it over. Starting in the center, smooth out any bubbles with a flat edge. I found that a spatula was an easy way to smooth out the bubbles. If you get a few bubbles, remember they will be covered up with plastic bins and food items. Once it’s nice and smooth, flip it back over to fold over the excess. That’s it!
Lay Foam Board on your Pantry Shelves

Lay the covered foam board onto the shelf. I used a few pieces of clear tape to anchor the front piece. Install another shelf and repeat the process until your kitchen pantry shelves are covered. Also, be careful of the pattern you choose. Mine doesn’t look as pretty as it did in the packaging. It’s almost old lady looking :/. Oh well! Better than the wire shelves!
Click here to see how I used this foam board hack in our linen closet.
Pantry Organization Hacks
A Pantry Door hanger Maximizes Vertical Space

I cleared out an entire kitchen cabinet because of this beauty! When it comes to a small pantry, you must capitalize on the vertical space when organizing your pantry items. A pantry door organizer can save you lots of space and I highly recommend you invest in one! You need this even if you do have a walk-in pantry! Here’s one I found on amazon. I am loving the new home for our spices! Having all of the spices in one space at MY eye level is way more practical than having to grab the stepladder every time I make a meal (I know, short girl problems).
Lazy Susans Make for a Great Storage Solution for a Small Pantry

I love lazy susans so much that I dedicated an entire blog post to them! You can read it here. Check it out to see how I DIY’ed some of our lazy susans. They are a great option for when you have a small pantry that needs to store a lot of good! Lazy susans offer great functionality by allowing you to use corners effectively and keep spaces tidy. They give you easy access to everything you need! Here’s a link to one of the lazy susans I have. Now my peanut butter won’t get shoved to the back of the pantry causing me to buy 6 jars. Now, I just do a quick little spin to check inventory when making our grocery list.
Airtight Food Storage Containers
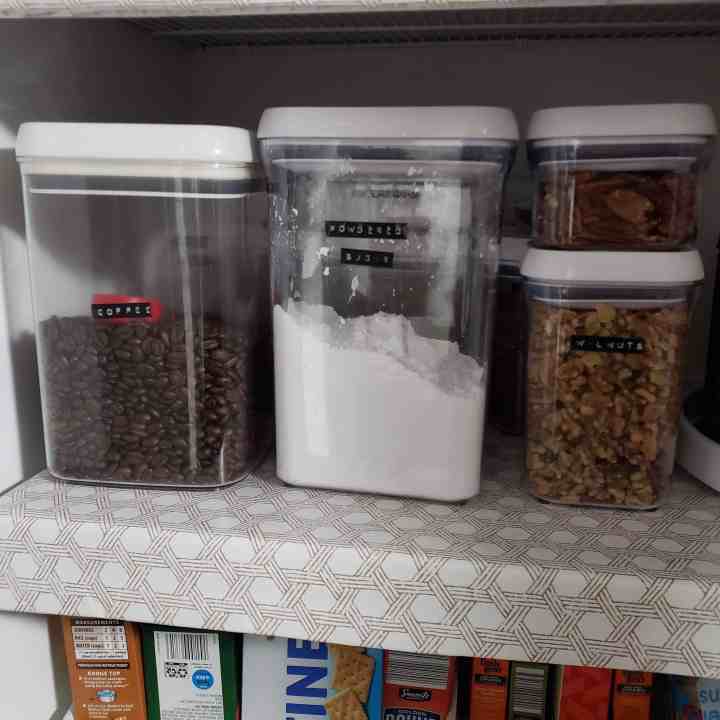
These air-tight OXO clear containers are the bomb! These airtight food storage containers keep our pantry staples nice and fresh. The stacking feature allows me to keep them organized and seen. OXO containers are a great tool for a small pantry like ours and look nice too! Here’s my Amazon link. They come in handy for all the weird flours I acquire when I’m on a health kick and attempt to swtich our our baking supplies. My $10 embossing labeler comes in handy when labeling the containers.
Free Kitchen Conversion Chart Printable

I’m not sure if I should count this as an organization tip, but this cheat sheet sure makes meal prep flow a lot easier! My FREE kitchen conversion chart printable is your new best cooking buddy! We use it every time we cook. It’s such an easy way to quickly convert your measurements of your wet and dry goods! I taped it to the back of our cabinet and another copy in our pantry so we can easily access it at any point during meal prep. Click here for your free copy!
Remove Spices from Original Packaging

Spices take up less amount of space when they are the same shape and not a bunch of different sizes and in their original packaging. I bought this kit to transfer the majority of our spices. I only have a few more to go! If you end up buying this same kit, know that the Trader Joe’s spices and the Great Value Organic spices are in the same glass jars. Peel off the label and replace it with an embossed label as I did.
Store your Food in Clear Bins, Glass Jars and Wicker Baskets

All my storage bins, wicker baskets and glass jars came from Walmart. I still need one more clear bin for my bread and baked goods, but can’t find it at any of our local Walmarts or online (insert eye roll). I thought about not posting this until I found one, but I figured you can use your imagination. These clear bins are handy because you can pull them out and look at their contents and check expiration dates. I am less likely to overbuy and waste when I can see everything easily.
Click here to see more kitchen organization posts for more organizing inspo!
Show me your Pantry Organization Tips and Tricks
Organizing a small pantry doesn’t have to be overwhelming or expensive. With a few creative hacks and some budget-friendly materials, you can transform your small pantry into a functional and aesthetically pleasing area. From covering wire shelving with foam board and contact paper to maximizing vertical space with door hangers and lazy susans, these tips are designed to help you make the most of every inch in your small pantry. Additionally, investing in clear, airtight glass jars not only keeps your dry goods fresh but also makes it easier to see what you have at a glance, reducing waste and simplifying meal prep by keeping track of expiration dates.
Remember, the key to a well-organized small pantry is consistency and regular maintenance. Take the time to declutter periodically, label your glass jars, and monitor expiration dates to ensure everything stays fresh. Utilize lazy susans to make accessing items easier and to maximize the limited space in your small pantry. By implementing these strategies, you’ll create a kitchen environment that not only looks great but also enhances your daily cooking experience. I hope these tips inspire you to tackle your small pantry organization with confidence and creativity. Don’t forget to share your own organization successes and challenges by tagging me on Instagram with #meagannicholedotcom!
Ready to take your small pantry to the next level? Check out my Kitchen Organization post for more in-depth strategies and inspiration. Let’s make your kitchen the heart of your home, organized and efficient!
- How to DIY a Elegant Pearl Balloon Backdrop for a Bridal Shower
- Valentine’s Day Gifts for Kids, Mom and Dad (Simple, Thoughtful Ideas for the Whole Family)
- End Table Decor Ideas That Actually Work in Real Life
- Small Bathroom Makeup Storage Ideas (That Actually Work in Real Life)
- DIY Bathroom Sign Ideas You Can Print at Home
DISCLAIMER: Links included in this description might be affiliate links. If you purchase a product or service with the links that I provide I may receive a small commission. There is no additional charge to you! Thank you for supporting, so I can continue to provide you with free content each week!
Leave a Reply