
Add a fun shabby chic touch to your home with these DIY rag balls by using scrap fabric. They make for great basket fillers and are as easy as cutting and gluing!
I was taking my Easter decorations down when I realized I don’t have an everyday filler for my wooden dough bowl. Since I purchased it, I’ve been filling it with seasonal items like pumpkins, ornaments, pinecones, and my DIY decoupage eggs. So I went to Google to do some research and found these darling rag balls all over. They were perfect for my bowl, but we all know I have a real problem with purchasing anything I can make myself, cue this super easy and fun DIY!
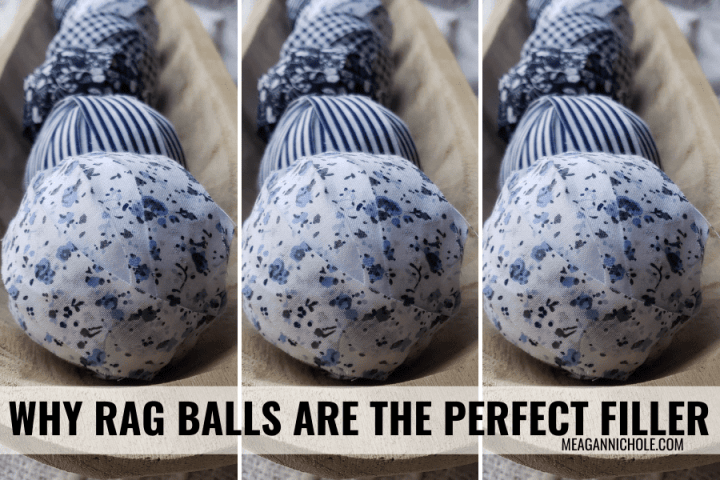
DIY rag balls are the perfect bowl or vase filler. They add a fun shabby chic farmhouse feel to your decor. They are the perfect way to fill an empty space and are easy to make! I like DIYs like this where you can just eyeball your measurements and not stress about perfection. You know I love to wing it! This DIY makes for the perfect Sunday craft while you catch up on your shows (which is exactly what I did). You will notice that each ball turns out a little bit different, making each one unique and even more shabby and charming.
Bonus: This DIY is niece and nephew proof! Which is very important to this Auntie!!
This post is all about DIY rag balls and why they are the perfect filler!
Pin for Later

Materials for DIY Rag Balls
For my set of rag balls, I went with navy and white patterned fabrics, but you could make these coordinate with any holiday or home decor color scheme. I might make a few red and white ones to mix in for the 4th of July and I am definitely making some with Christmas plaid fabric this year! If you have scrap fabric laying around, then use what you have!
Fabric Squares/ Fat Quarters or leftover fabric you have laying around
Hot glue Gun -This is linked to a cool cordless one!
Instructions to Make DIY Rag Balls
Gather Fabric

To begin your rag ball DIY, you will want a variety of fabric squares. A 10”x10” square is more than enough to cover a 3” styrofoam ball. Fabric squares can be found just about anywhere that sells craft supplies or you can go the recycle route and reuse scrap fabric from old clothes or linens or your sewing stash. Walmart has a surprisingly good selection of fabric squares, so don’t forget to check next time you are out grocery shopping. The navy and white fabric bundle I use for this tutorial came from Amazon, and there were several color options. If you order online, search for fabric bundles, fat quarters, or fabric squares to see all of your options.
Cut Fabric into Strips

Once you have a variety of coordinating fabric squares, cut them into equal(ish) strips or “rags”. The easiest way is to keep cutting the fabric in half until you have strips that are about 1” wide and 10” long. Perfection isn’t necessary here and frankly unwanted. The unique imperfections of the strips are what make these rag balls so charming. If you think the strips are too wide, you can always trim as you go.
Be sure to use your best pair of scissors for this step! You don’t want the fabric strips to have unnatural-looking jagged edges because you used dull scissors. You can also cut into your square to start, and then rip your way through the rest of the fabric.
If you want a more frayed look, pull at the edges of the fabric before moving to the next step.
Glue Strips to Styrofoam

Each strip of fabric should be glued to the styrofoam ball in at least three different areas; both ends and in the middle of the strip. Using your hot glue gun, add a small dot of glue (think hole punch size) to your styrofoam ball and press one end of the strip into the glue.
Smooth the glue out as much as possible to avoid a mound of glue from forming. You don’t want your rag balls to form into lemons.
Then add another dot of glue to the opposite side of the ball, and press the midpoint of the strip into the glue. Add one more dot of glue on top of the glued-down strip and press the other fabric end into the glue. Both ends of the fabric should overlap.
Repeat this step until your ball is completely covered. I used 6 – 8 strips of fabric for each ball.
That’s it! I told you it was easy! Essentially you’re are cutting fabric into strips and gluing them to a ball. It’s not rocket science!
How to Decorate with DIY Rag Balls


Once you have several fabric balls complete, it’s time for the fun part of displaying them. These DIY rag balls act as great fillers, which is one reason why they are so versatile. Try adding them to a basket, jar, lantern, or dough bowl. Or you can place them on top of a few candle holders or a stack of books. If you want to make a banner/garland with your DIY rag balls, hot glue string or twine to the top of them and display them that way.
Decorating with these DIY rag balls is like decorating with any small accent, keep it casual and don’t overthink it! The rag balls add an additional element of texture and charm anywhere they are used. Plus, it’s a great way to reuse scrap fabric! Don’t get overwhelmed, just toss them into a few places until you like the aesthetic and enjoy.
Free Decorating Guide

Want some more decorating inspo? Snag my FREE decorating guide to help you make your home a space you can be proud of! This guide take you through my simple process of decorating.
Click here for your FREE Decorating GUIDE
Share your DIY Rag Balls
As always, thank you for following along with me in my creative journey. Be sure to tag me and use #meagannicholedotcom when sharing your rag balls! Thanks for stopping by MeaganNichole.com
DISCLAIMER: Links included in this description might be affiliate links. If you purchase a product or service with the links that I provide I may receive a small commission. There is no additional charge to you! Thank you for supporting, so I can continue to provide you with free content each week!
Leave a Reply