

The mornings are getting cooler and the leaves are starting to change. What better way to celebrate this wonderful season than with a cheap and festive Dollar Tree DIY! This foam pumpkin DIY was a blast! I strolled past these foam pumpkins year after year due to the aggressively bright orange. I’m ashamed my inner DIY-er didn’t kick in until this year! I made up for it by ordering an entire case from Dollar Tree. Some of these DIYs are super quick and others are more time consuming. Pick your poison and have some fun! Let’s transform some pumpkins!
This post is all about foam pumpkin makeovers!
A few Pumpkin Tips..
- Foam Pumpkin Anatomy:
- I reference the rib and rind of the pumpkin several times throughout this tutorial
- Rib: lines in the pumpkin
- Rind: the humps of the pumpkin
- I reference the rib and rind of the pumpkin several times throughout this tutorial
- Cut the tag with scissors instead of pulling it off – I ruined a pumpkin or two
- Paint your pumpkin with a base color to avoid bright orange peeking through
- Get creative with your stem! The stem can be painted, covered, or replaced with something like twigs or a wine cork
Paint


The foam pumpkins absorb paint beautifully! The paint dries with a chalk-like finish that compliments the fall theme well. I used my good ol’ Craft Smart and Apple Barrel acrylic paint – nothing fancy!
- Paint the bottom ½ of the pumpkin and let dry
- You can also set the pumpkin on a cup before painting the top or insert a few toothpicks to prop it up and preventing it from sticking to your surface
- For a natural look, make the ribs of the pumpkin much darker than the rest
- Mixing your colors with brown will help add character to your pumpkin
- Avoid completely mixing colors together by dipping your brush in each color instead
Hot Glue


This is the first time I used my beloved hot glue gun to design. How simple and fun?! I went with a topiary style since the combination of these pumpkins were so cute together.
- Paint the pumpkin before applying hot glue
- For this look, apply the same simple design to each rind of the pumpkin
- Once hot glue is dry, paint the entire pumpkin.
- 1-2 coats is sufficient
- If you want to create a topiary like mine, simply stack the pumpkins on top of one another and use glue or a few kabob skewers to keep them connected
Book Pages/Newspaper


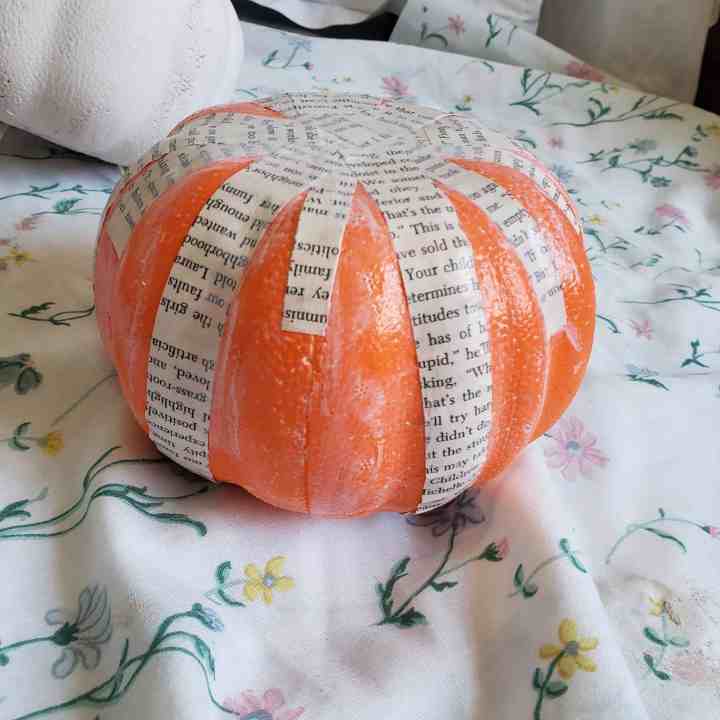

My love for decoupage runs deep! These book page pumpkins will elevate your fall display without being distracting. Don’t have Modge Podge? Glue works great too!
- Cut several book pages into strips – I recommend ¼ of an inch to allow optimum flexibility
- Starting at the bottom of the pumpkin, paint a small section with modge podge
- Lay several strips on the pumpkin, and cover with a top coat of modge podge
- Repeat until the pumpkin is completely covered
- I had to take a few breaks to wash the dried modge podge off my finger tips and brushes
Yarn


If a pumpkin could be described as cozy, this would be the one! I got this idea from the very talented Dale Marie over at Blooming DIY-er. Be sure to check out her work!
- Start by wrapping your yarn around the pumpkin 3 times to measure, then cut
- Repeat 8 more times
- Tie the 9 strands in a knot at one end, braid them, and make another knot
- Clip the strands to a clipboard to make it easier while braiding
- Create a quarter-size hole at the top of the pumpkin
- Insert one end of the braid in the hole, wrap it around the pumpkin, then insert the other end in the hole
- Repeat until the pumpkin is completely covered
- Finish with a stem
Glitter

- Ahhh Glitter! What a beautiful mess! This glitter-coated pumpkin is a great way to add a little sparkle to your fall display.
- Cover bottom half of pumpkin with modge podge
- Set pumpkin in container to contain the glitter mayhem
- Sprinkle a generous amount of glitter onto the glued area
- Let Dry
- Repeat for the top of the pumpkin
- Check for bare spots
- Depending on how sparkly you want your pumpkin to be, feel free to add a 2nd coat of glitter by repeating the process
- Seal with a top coat or additional layer of modge podge
Thumb Tacks


Who knew a box of thumb tacks could make a pumpkin this exciting!? I was pleasantly surprised with how this one turned out. I want to cover an entire pumpkin next time!
- Apply tacks to the ribs of the painted pumpkin by starting at the bottom and working your way up. Let the tacks overlap slightly.
- Cover foam stem in tacks
Scrapbook Paper

I told you my love for decoupage runs deep!
- I used the same method as I did for the book pages (see above), but used scrapbook paper instead. For reference, this took about 1.5 pages of 12×12 scrapbook paper to cover the entire pumpkin.
Twine

This foam pumpkin took the longest, but I love how it turned out! The texture of the twine is rustic but still simple. I recommend firing up some Netflix or YouTube while working through this one. This photo was taken before I melted the glue down. Keep reading for my blow dryer hack!
- Line a bead of hot glue on one side of the pumpkin (start in a rib) and carefully push the twine into the glue. Continue working your way around the pumpkin.
- Focus on one rind at a time. Once it’s covered, cut the twine and start on a new rind to create layers.
- Once the pumpkin is completely covered, take a blow dryer to your pumpkin to melt away any stray glue strands
Fabric


You don’t have to be a seamstress or even own a needle and thread for this method. All you have to do is fold and tuck! I used new fabric for these pumpkins, but feel free to use scrap material from old clothes, blankets, or towels.
- I used a fat quarter of fabric (usually measures about 18” x 22”)
- Create a nickel-size hole in the top of the pumpkin
- Lay the fabric out (design facing down) and place the pumpkin in the center
- Starting with a corner piece, insert one section of the fabric into the hole at a time
- Adjust creases as you go
- Continue until the pumpkin is covered in the fabric
- Finish with a stem
Planter


How beautiful would these look at a fall wedding or shower?! I used succulents for this DIY, but fall flower stems would look beautiful as well!
- Paint the pumpkin
- Floral stems can be pushed through the foam pumpkin, but it may become top heavy
- If you have a foam floral brick, cut a hole out of the top of the pumpkin and insert the brick
- Starting with larger stems, insert them into the brick
- Repeat until desired look is accomplished
Spray Paint


Can we take a moment to appreciate the magic that is spray paint! It’s the ultimate DIY tool! I like mixing these metallic gold pumpkins with my neutral decor.
- Spray the bottom half of your pumpkins
- Once dry, raise or remove the stems to spray the top
- 2 coats will do the trick
- If you spray too close, the spray paint can disintegrate the foam a bit, creating a different texture – I think it looks cool, but just a heads up
Share it!
That’s all for now! Let me know if you have any questions!
As always, thank you for following along with me in my creative journey. Be sure to tag me and use #meagannicholedotcom when sharing your own foam pumpkin DIYs! Thanks for stopping by MeaganNichole.com

- Graduation Centerpiece Ideas for Guys (Creative, DIY & Budget-Friendly Ideas)
- Construction Signs Printable (Free PDF Download + 19 Ways to Use Them)
- 25 Balloon Arch Design Ideas That Anyone Can Recreate
- How to Make Foam Board Party Cutouts (Easy DIY Tutorial)
- How to DIY a Elegant Pearl Balloon Backdrop for a Bridal Shower
DISCLAIMER: Links included in this description might be affiliate links. If you purchase a product or service with the links that I provide I may receive a small commission. There is no additional charge to you! Thank you for supporting, so I can continue to provide you with free content each week!
I just love the succulent pumpkin. Beautiful pumpkins! 😀