
Let me help you personalize your space by showing you how to paint pillows with regular craft paint.

Pillows are one of my many décor weaknesses, so it was only a matter of time before I took a wack at a DIY version. I love this DIY because it’s a great way to tie in a room by using paint colors that coordinate with other decorations in your space or adding significant words, names, and phrases that are meaningful to your family. These pillows turned out way better than expected and I am excited to show you how easy it was to do. I include some simple designs to consider for those who are not as comfortable with a paintbrush.
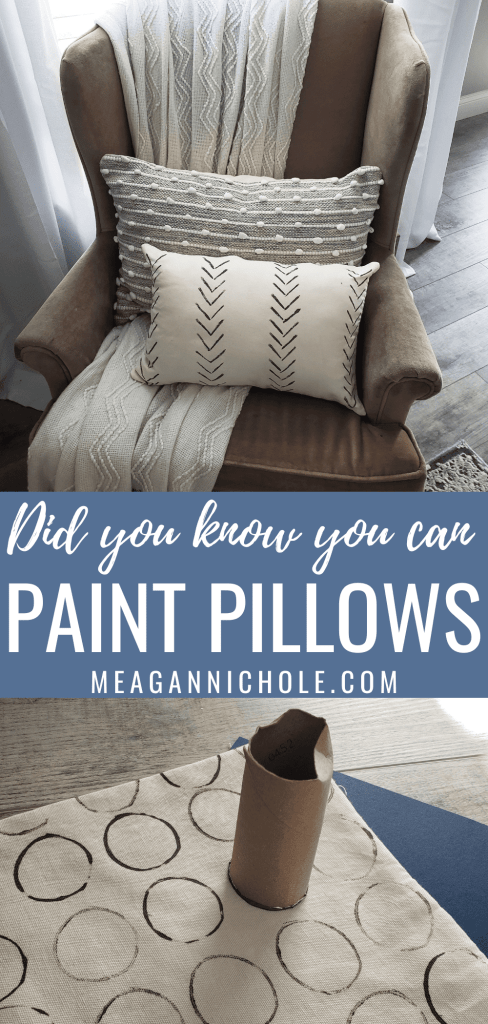
Pin How to Paint Pillows for Later
Materials needed to Paint Pillows
**I purchased my pillowcases and inserts from Amazon but this DIY works for any pillowcase and filler.
- Pillowcases – I love how versatile this lumbar shape is
- Pillow Inserts or Filler
- Acrylic Paint
- Cardboard or scrap paper
Instructions on How to Paint Pillows
Prep Pillowcases

There are a few things I suggest doing to prep your pillowcases before you begin painting your pillows. I highly suggest washing and drying your pillowcases to avoid shrinkage later. This way you are painting the pillowcase at the size it will most likely stay. If your pillowcase has a zipper, be sure to zip it closed before washing.
My pillowcases were pretty wrinkly after I pulled them out of the dryer so I flipped them inside out and quickly ran the iron over them. It’s easier to iron or steam your pillowcases before painting them. I swear I get my iron out more for the blog than I do for my wardrobe.
The last step before you get to the fun part is inserting a few pieces of cardstock, newspaper, or cardboard inside your pillowcase. This will help prevent paint from bleeding through.
That’s it!
Paint Pillowcases
Now for the fun part! Painting pillowcases isn’t much different than painting canvas or paper. Practice your design on paper and paint the design on your pillowcase. Easy peasy! You can use stencils, stamps, or freehand them if you wish. Just remember fabric with larger threads such as burlap, will make it trickier to paint smoother lines, so go slow at first.
Do I need to use fabric paint?

You can absolutely use fabric paint for this project, but I didn’t simply because I don’t have any. For once, I didn’t feel like it was necessary to purchase fabric paint or fabric paint medium for just one small project. I have tons of acrylic paint and I know it sticks to fabric. Just look at the clothes in my closet!
If you use fabric paint or medium, your painted design will most likely lay softer on your pillowcase, but I found the loophole by washing and drying my pillowcases a few times to help soften them.
How to pick your colors

Take a walk around your house to help you decide what colors to use for your pillow designs. Our house is full of neutrals like white, beige, gray, and wood tones. I want to slowly start adding a little bit of color to our space, so I wanted to do so with this project. I am naturally drawn to blues which work very well with my neutral pallet, so that’s what I went with. Honestly, I’m not super in love with this design for my space, but it was fun doing it. I’m going to “let it breathe” and see if I can get used to it.
Design Ideas

You don’t have to be Picasso for this DIY. There are so many simple designs that look great and are super easy to paint. I used a toilet paper roll for my repetitive circle pattern which is something anyone can do. You can also buy or make stencils to help improve your design. Don’t overthink it though. My herringbone pattern is not at all perfect but you can’t even tell once I inserted the pillow. I think imperfect lines add character to your design. Embrace it!
If you are having a brain block on what design to go with, take a stroll around the house. What patterns do you see? Is there something simple you can recreate? Try repetitive patterns like dots, dashes, rainbows, stars, or squares. If you or a friend have a Cricut, create a stencil using a cool font or silhouette image. Another good idea is to Google “simple abstract” for inspiration. Seriously, anything goes! Your pillow has two sides, which means you have 2 blank pages to work with!
Wash and Decorate with your Pillowcases

Let your pillowcase dry for a day and then toss it in the wash one last time. I am going for a more worn look, so I plan to wash mine a few times before displaying them. If you want to protect the design, flip the pillow case inside out before washing.
Now it’s time to decorate! I keep moving my pillows around the house, but I think I will leave one on our accent chair in the living room and the other on the bench at the end of our bed. This lumbar size is a fun shape to decorate with.
Free Decorating Guide

Want some more decorating inspo? Snag my FREE decorating guide to help you make your home a space you can be proud of! This guide take you through my simple process of decorating.
Click here for your FREE Decorating GUIDE
Share your Painted Pillow with Me
As always, thank you for following along with me in my creative journey. Be sure to tag me and use #meagannicholedotcom when sharing how you paint pillows! Thanks for stopping by MeaganNichole.com
DISCLAIMER: Links included in this description might be affiliate links. If you purchase a product or service with the links that I provide I may receive a small commission. There is no additional charge to you! Thank you for supporting, so I can continue to provide you with free content each week!
More Meagan Nichole DIYs You will Love
- DIY Rope Basket – Make your own basket
- Photo Transfer – Make some wood photo prints
- Rag Balls – The perfect filler!
- Mud Painting – Yes, actual mud!
- Book Stacks – Personalize your space for $3 for less
- Concrete Planters – Way cheaper than the ones at Target!
- Reversed Canvas – Make your own signs!
- Beaded Garland – Dollar Tree for the win!
- Jewelry Dish – Using 3 ingredients you already have! No clay needed!
Leave a Reply