
Let me help you get ready for the upcoming fall season with this super easy Dollar Tree pumpkin wreath DIY. It’s perfect for your front door!

It’s that time of year where my décor is starting to look all warm and cozy while the weather is all hot and sweaty! Whether you are embracing the upcoming fall season or desperately clinging onto the last bits of summer, I think you are going to love this DIY Dollar Tree Pumpkin Wreath!
I am so excited to finally start sharing some of my new Fall DIYs with you and I thought this Dollar Tree Pumpkin wreath was the perfect way to start! It takes little time to make and costs less than $10!
If you frequent your local Dollar Tree as much as I do, chances are you’ve seen their pumpkin wreath form pop up every year as I have. Well, this year I decided to pick one up in an attempt to make a pumpkin wreath that’s actually tasteful and not cheesy… no offense, but there are a lot of cheesy pumpkins out there!
This post is all about my Dollar Tree pumpkin wreath tutorial!
Pin Dollar Tree Pumpkin Wreath For Later

Materials for Dollar Tree Pumpkin Wreath
- Pumpkin Wreath Form
- Snips or Wire Cutters
- Wooden Beads
- Hot glue and Hot Glue Gun – This one is cordless!
- Greenery – I used lamb’s ear
Instructions for Dollar Tree Pumpkin Wreath
Where can I find a Pumpkin Wreath Form?
I always see the pumpkin wreath forms at Dollar Tree at the end of summer, but if you are having no luck or looking at a different time, try Etsy or a craft store. Amazon charges way too much for one if you ask me!
Spray Paint the Wreath Form

Since the form was a similar color to our front door, I decided to add contrast by spraying one of the forms white. If you would like for your form to be something other than black (or maybe yours is green and you would like to make it black), then you will want to do so now. Check out my spray painting tips here on my laminate cart makeover.
Cut the Wreath Form
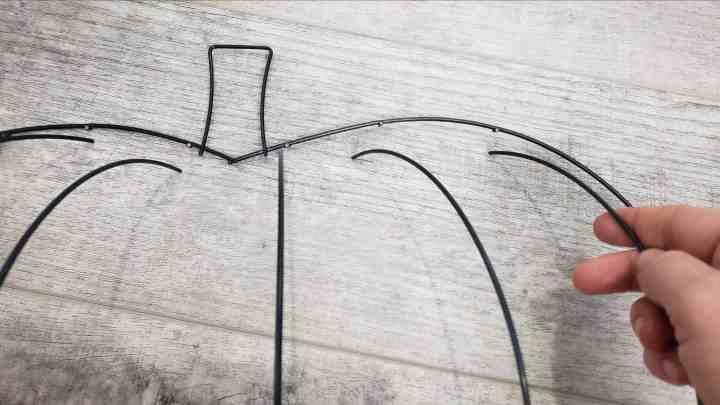
If your form is like mine, you will have 6 wires protruding away from the wreath form creating a 3D-like shaped pumpkin. We are going to call these wires the ribs of the pumpkin. Cut each of the ribs away from the form at the very top using a pair of snips. You can also do this by bending the ribs back and forth until they snap off. Be sure to NOT cut the two end pieces that lay flat and are connected to the stem- just the ribs.
Add Wooden Beads to the Wreath Form

Once all of the ribs of the pumpkin have been snipped, start threading your wooden beads onto each rib wire.
How Many Wooden Beads will I need for this wreath?
It takes around 20 beads to completely fill each wire, which is about 120 beads total per wreath.
Glue the last bead back to the Wreath Form

When adding your last bead, fill the hole with hot glue, let it cool for a few seconds, then thread it onto the wire just as you did with the other beads.
Connect the rib wire back to the top of the pumpkin by pressing the glue oozing out of the bead onto the form where the wire was originally connected before cutting it. Add a dime-size amount of hot glue to the area and hold it in place for at least 30 seconds.
Can I Paint the Beads?
Of course, you can paint wooden beads! I left the beads their natural color for this DIY, but I have some really great tips on how to paint a ton of beads at one time on my farmhouse beaded garland tutorial here. You basically string a bunch of beads, dip them in paint and hang them to dry.
Wrap Twine Around the Stem

To decorate your stem the way I did, wrap twine around the outside of the stem until you get to the top. Make sure the ends of the twine are on the backside of the stem then add some glue to both ends. That’s it! If you have strings or ugly globs of hot glue showing, carefully melt them away using the tip of the hot glue gun.
Add Greenery to the Top

Finish your pumpkin wreath by adding some greenery or a few floral pieces. I used my favorite greenery for this project, lamb’s ear! I did this by cutting 2 6″ pieces off of the garland, intertwining two pieces of lamb’s ear around the top of the pumpkin and gluing the ends to the back of the stem towards the base.
Add Twine to Hang
To be able to hang your pumpkin wreath, tie a piece of twine around the top of the form. I tied mine near the 2nd and 5th rib wire. You can also hang it on a hook too.
Free Wreath Making Guide

Want to make more inexpensive and easy wreaths for your home!? Snag this FREE Wreath Making Guide to help you make any wreath you ever dreamed of… or saw on Pinterest!
Click here for your free copy!
More Easy Fall DIYs for your Home
Dollar Tree Foam Pumpkin Makeovers – You will be amazed how these turned out!
$10 Hoop Wreath – Another easy and cheap wreath DIY
How to Decorate for Fall – Ever feel lost when trying to add fall to your home? This post is for you!
Wheat Wreath Tutorial – WAYYYY cheaper than the one I fell in love with at Pottery Barn
Thanksgiving Centerpiece Ideas – Centerpieces don’t have to be complicated to be beautiful!
Share your Dollar Tree Pumpkin Wreath
This post was all about how to make a Dollar Tree Pumpkin wreath for your front door this fall!
As always, thank you for following along with me in my creative journey. Be sure to tag me and use #meagannicholedotcom when sharing your Dollar Tree pumpkin wreath! Thanks for stopping by MeaganNichole.com
DISCLAIMER: Links included in this description might be affiliate links. If you purchase a product or service with the links that I provide I may receive a small commission. There is no additional charge to you! Thank you for supporting, so I can continue to provide you with free content each week!
Latest from the Blog

Graduation Centerpiece Ideas for Guys (Creative, DIY & Budget-Friendly Ideas)
Looking for graduation centerpiece ideas for guys? Discover creative DIY centerpieces that are easy to make and perfect for celebrating! This post is all about graduation centerpiece ideas for guys! If you’re searching for graduation centerpiece ideas for guys, you’re in the right place. As a boy mom, I know firsthand that decorating for boys…

Construction Signs Printable (Free PDF Download + 19 Ways to Use Them)
Download free construction signs printable PDFs for birthday parties, classrooms, pretend play, and construction-themed decorations. If you’re planning a construction birthday party, creating a construction-themed play space, decorating a classroom, or looking for fun pretend play printables, these construction signs printable designs are one of the easiest ways to bring your theme to life. Construction signs are one…

25 Balloon Arch Design Ideas That Anyone Can Recreate
Get inspired with these balloon arch design ideas for birthdays, baby showers and parties, plus simple tips to help beginners. If you’ve ever volunteered to help with a party and somehow ended up becoming the balloon person, welcome. Maybe you searched balloon arch design and immediately felt overwhelmed. Giant installs, hundreds of balloons, expensive supply…
Leave a Reply